· admin2282 · Blog · 7 min read
Facial Recognition: Building a Complete, Simple, and Lightweight System
Introduction
Facial recognition is part of the broader field of computer vision. Thanks to the dramatic advances in Deep Learning over the past decade, this field, and all its practical applications, has reached an impressive level of maturity.
But the good news is that understanding how a facial recognition system actually works, and even building one yourself, has never been more accessible.
In this article, I present a small project that we built step by step, so you can very concretely visualize the mechanics behind these algorithms. The goal is not to delve into complexity, but to provide a clear explanation, illustrated with simple, easy-to-understand code.

📌 The complete (and quite old) project code is available here: https://github.com/nbrosson/tt-face-recognition
(I’ve tried to use slightly cleaner code in the article, as this code is several years old…)
What exactly is facial recognition?
Facial recognition is the ability of a computer system to identify or verify a person from an image or video of their face.
There are two main uses:
- Identification (one-to-many): Determining who the person is from a set of known identities. This is what we will use in this project.
- Verification (one-to-one): Verifying that a person is indeed who they claim to be.
TL;DR – Simple Version
Suppose you want to spot if Julia, Thomas, or Rémy appear in a photo.
Our model must:
- Analyze several images of Julia, Thomas, and Rémy.
- Extract only their faces.
- Transform each face into a numerical vector.
- Do the same for the photo you send to the API.
- Measure the similarity between the vectors.
- Identify which of the trio most closely resembles the person in the image.
- And if the person isn’t in any category, the model will return the most similar person.
Here is a summary of the steps:
- We apply face detection to all images in the reference group (Julia, Thomas, Rémy).
- We store these results locally.
- We apply the same detection to the image sent by the user.
- We transform each face into a 1D vector using a pre-trained model (VGGFace).
- We compare the vectors using Euclidean distance.
- The one with the smallest distance is considered the closest match.
The Project
Here is the folder structure:
├── data/
│   ├── images/
│   │  ├── images_array/      # Face detection results
│   │  ├── raw_images/        # Raw images per person
│   │  |  ├── player_1/
│   │  |  ├── player_2/
│   │  |  ├── .../
├── face_detector/
│   ├── *.py
├── templates/
│   ├── *.html
We want to:
➡️ Build a complete facial recognition algorithm
➡️ Make it accessible via a simple Flask application
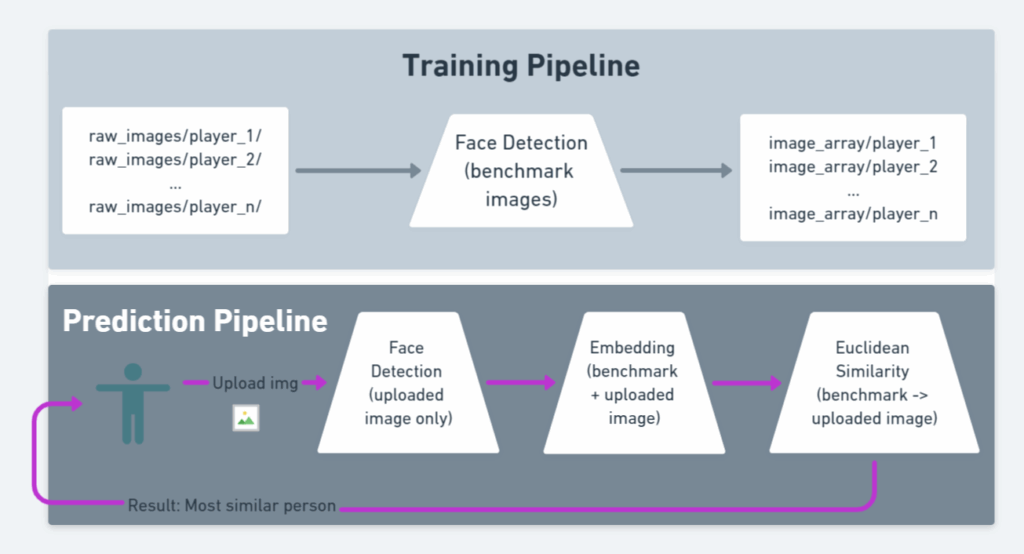
The project is divided into 4 steps:
- Define the reference group
- Raw images in
data/images/raw_images/<person_name>.
- Raw images in
- Apply face detection (benchmark)
- This is the costly part.
- We do it offline, once and for all.
- This is called the training pipeline.
- Apply embedding
- Transform the faces (images) into 1-dimensional vectors via VGGFace / ResNet50.
- This step is lightweight; we can do it for each request.
- Make the prediction
- Compare the vectors → identify the most similar person.
The complete pipeline (detection + embedding + comparison) constitutes the prediction pipeline.
Below is a summary diagram:
Diving into the Code
Dependencies
- Python ≥ 3.6.
- If OpenCV causes problems, use
opencv-python-headless.
text
opencv-python==4.2.0.34
Flask==1.1.1
mtcnn==0.1.0
Pillow==7.2.0
keras-vggface==0.6
tensorflow==2.2
Face Detection
import os
import cv2
import numpy as np
from mtcnn import MTCNN
from PIL import Image
from keras_vggface.vggface import VGGFace

def extract_face(img, required_size=(224, 224)):
    """
    Extracts the main face from an image during benchmark preprocessing.
    :param img: image as a numpy array (BGR, as returned by cv2)
    :return: numpy array (1, 224, 224, 3) or None if no face is found
    """
    detector = MTCNN()
    results = detector.detect_faces(img)

    if len(results) == 0:
        return None  # No face detected

    x1, y1, w, h = results[0]['box']

    # Secure the boundaries
    x1 = max(0, x1)
    y1 = max(0, y1)
    x2 = x1 + max(0, w)
    y2 = y1 + max(0, h)

    face = img[y1:y2, x1:x2]

    # Resizing
    face_img = Image.fromarray(face)
    face_img = face_img.resize(required_size)
    face_array = np.asarray(face_img)

    return face_array.reshape(1, required_size[0], required_size[1], 3)

def load_image_from_bytes(file_bytes):
    """Converts bytes into a numpy image usable by OpenCV
    when you receive an image via an API (upload), as bytes.
    """
    nparr = np.frombuffer(file_bytes, np.uint8)
    return cv2.imdecode(nparr, cv2.IMREAD_COLOR)
Embedding
We initialize the model only once:
from keras_vggface.vggface import VGGFace

model = VGGFace(
    model='resnet50',
    include_top=False,
    input_shape=(224, 224, 3),
    pooling='avg'
)
Embedding & Aggregation
def compute_embedding(face_array):
    """
    Called after extract_face, on the extracted face.
    """
    return model.predict(face_array)[0]  # shape (2048,)

def compute_benchmark_embeddings(face_arrays_dict):
    """
    Called once you have all the extracted faces for each person in the benchmark.

    :param face_arrays_dict: {"personA": [face_array1, face_array2], ...}
    :return: {"personA": embedding_vector, ...}
    """
    embeddings = {}
    for person, arrays in face_arrays_dict.items():
        if len(arrays) == 0:
            continue
        vectors = [compute_embedding(arr) for arr in arrays]
        embeddings[person] = np.mean(vectors, axis=0)
    return embeddings
Face Comparison
Euclidean distance:
python
def euclidean_distance(a, b):
    """
    Called during prediction, to compare the embedding of the uploaded image to each benchmark embedding.
    """
    return np.linalg.norm(a - b)
Final Script
def load_benchmark_faces(raw_images_root):
    """
    Traverses the raw_images_root directory and extracts faces.
    Expected structure:
        raw_images_root/
            person_1/
                img1.jpg
                img2.jpg
            person_2/
                img3.jpg
    :return: dict {"person_name": [face_array1, face_array2, ...], ...}
    """
    benchmark_faces = {}

    for person_name in os.listdir(raw_images_root):
        person_dir = os.path.join(raw_images_root, person_name)
        if not os.path.isdir(person_dir):
            continue

        face_arrays = []
        print(f"\n👤 Processing person: {person_name}")

        for filename in os.listdir(person_dir):
            filepath = os.path.join(person_dir, filename)
            if not os.path.isfile(filepath):
                continue

            # Load the image with OpenCV
            img = cv2.imread(filepath)
            if img is None:
                print(f"  ⚠️ Could not read file {filepath}")
                continue

            # Step: face detection + face extraction
            face_array = extract_face(img)
            if face_array is not None:
                face_arrays.append(face_array)
                print(f"  ✅ Face extracted from {filename}")
            else:
                print(f"  ❌ No face detected in {filename}")

        benchmark_faces[person_name] = face_arrays

    return benchmark_faces

# =========================
# 4. Prediction Pipeline
# =========================

def predict_person_from_image(image_path, benchmark_embeddings):
    """
    Takes an input image and returns the most similar person.

    :param image_path: path to the image to test
    :param benchmark_embeddings: dict {"person_name": embedding_vector}
    :return: (best_match_name, best_distance) or (None, None) if failed
    """
    img = cv2.imread(image_path)
    if img is None:
        print("⚠️ Could not read the input image.")
        return None, None

    # 1) Face extraction
    face_array = extract_face(img)
    if face_array is None:
        print("⚠️ No face detected in the input image.")
        return None, None

    # 2) Embedding of the uploaded image
    uploaded_embedding = compute_embedding(face_array)

    # 3) Comparison with all benchmark embeddings
    best_name = None
    best_distance = None

    for person, emb in benchmark_embeddings.items():
        dist = euclidean_distance(uploaded_embedding, emb)
        print(f"Distance with {person} : {dist:.4f}")

        if best_distance is None or dist < best_distance:
            best_distance = dist
            best_name = person

    return best_name, best_distance

if __name__ == "__main__":
    RAW_IMAGES_ROOT = "data/images/raw_images"

    print("🔹 Loading and extracting benchmark faces...")
    face_arrays_dict = load_benchmark_faces(RAW_IMAGES_ROOT)

    print("\n🔹 Calculating benchmark embeddings...")
    benchmark_embeddings = compute_benchmark_embeddings(face_arrays_dict)

    TEST_IMAGE_PATH = "data/images/test_image.jpg"

    print(f"\n🔹 Prediction on image: {TEST_IMAGE_PATH}")
    best_match, distance = predict_person_from_image(TEST_IMAGE_PATH, benchmark_embeddings)

    if best_match is not None:
        print(f"\n✅ Most similar person: {best_match} (distance = {distance:.4f})")
    else:
        print("\n❌ Could not find a match (no face or read error).")
Running the Project
First, make sure:
- Each person in the benchmark has their own folder in
raw_images images_array/exists and is empty initially
Launch the project
bash
pip install -r requirements.txt

# Apply face detection offline
python main.py apply-face-detection-on-benchmark-people

# Launch the Flask app
export FLASK_APP=app.py
flask run --port=5000
You can now go to:
Upload an image and check that the model finds the right person.
Conclusion
We have built a complete facial recognition pipeline:
- Face detection
- Extraction
- Embedding via VGGFace
- Vector comparison
- Flask API to test the whole system